Sending messages
There are a few different methods that can be used to send messages in the Web Portal depending on your needs. Let's take a look...
(There are some important things to remember at the bottom of this article)
Quick Message
Just like sending a message from your own handset, Quick Message is an easy way to send ad hoc messages fast!
You will find a Quick Message link in the header bar of every page so it's always one click away.
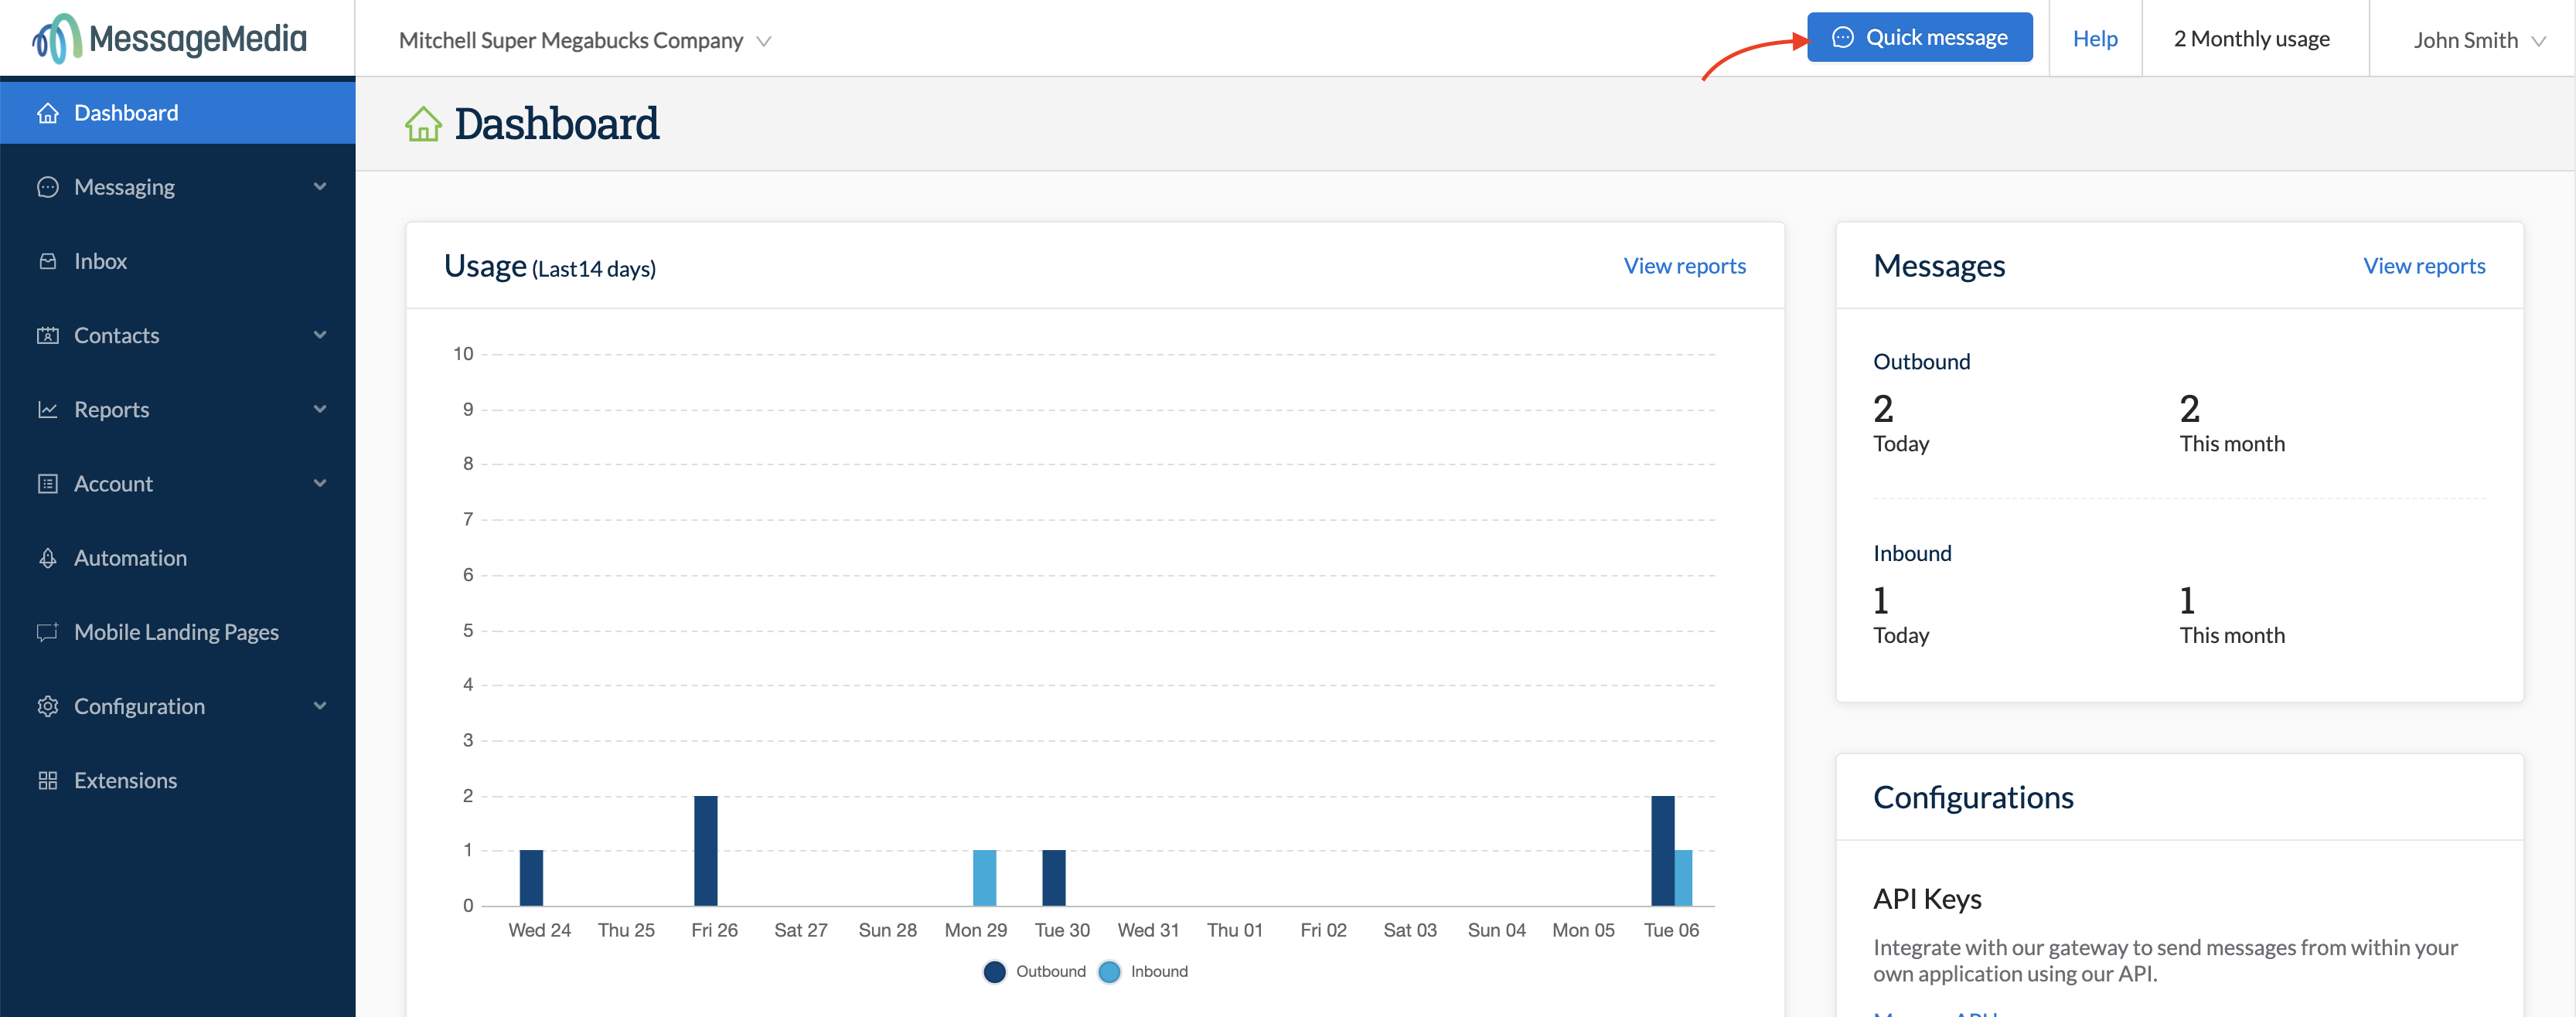
It contains two simple fields:
- To - type a mobile number, contact name or group name – or combination
- Compose - type your message. The character count and credits are calculated as you type
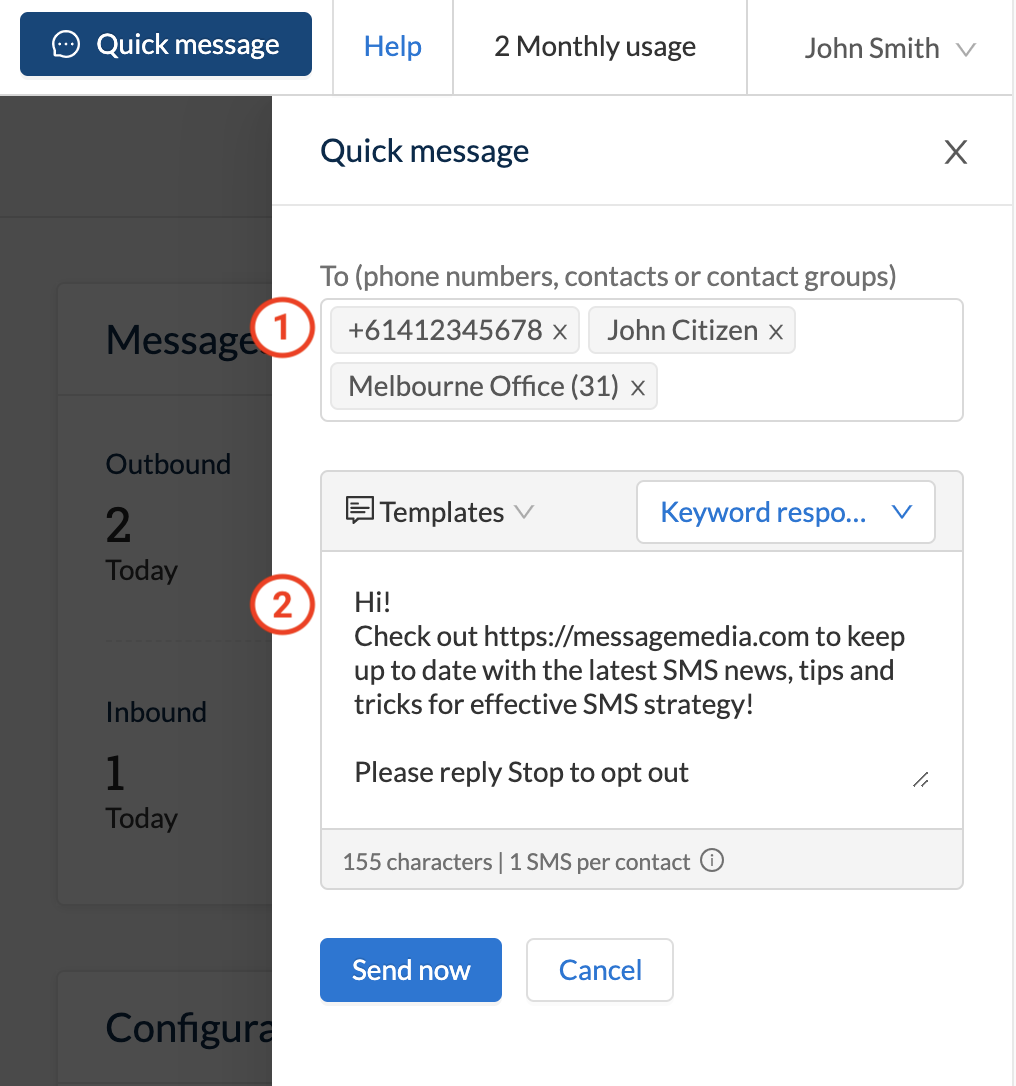
Once you’re finished, simply hit Send now and your message will be processed! Simple!
Helpful Tips:
- You can send to multiple contacts and/or groups with QuickMessage
- You can add a simple opt-out message by clicking the “Opt-out message” button
- Check the bottom of the message box to see how many characters and messages are being utilised for your send
"New Message" with preview
In the left-hand menu, click "Messaging" and then "New Message":
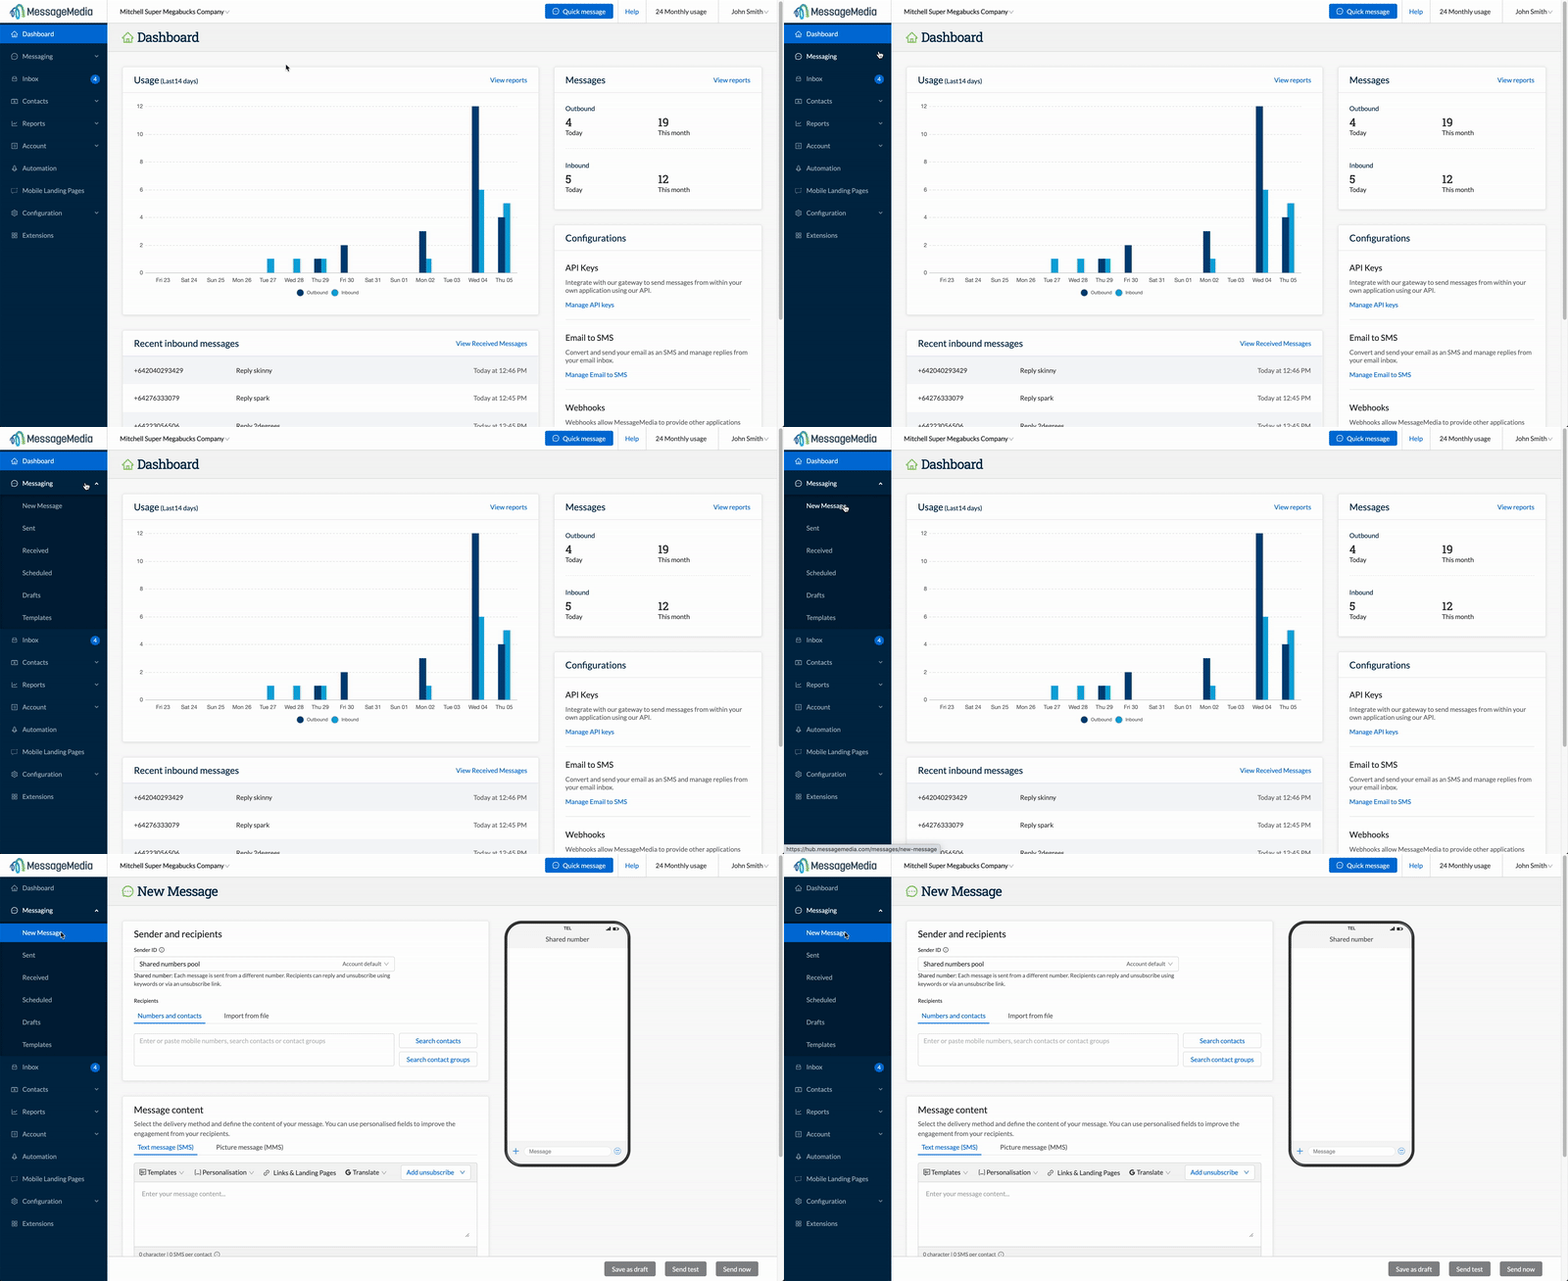
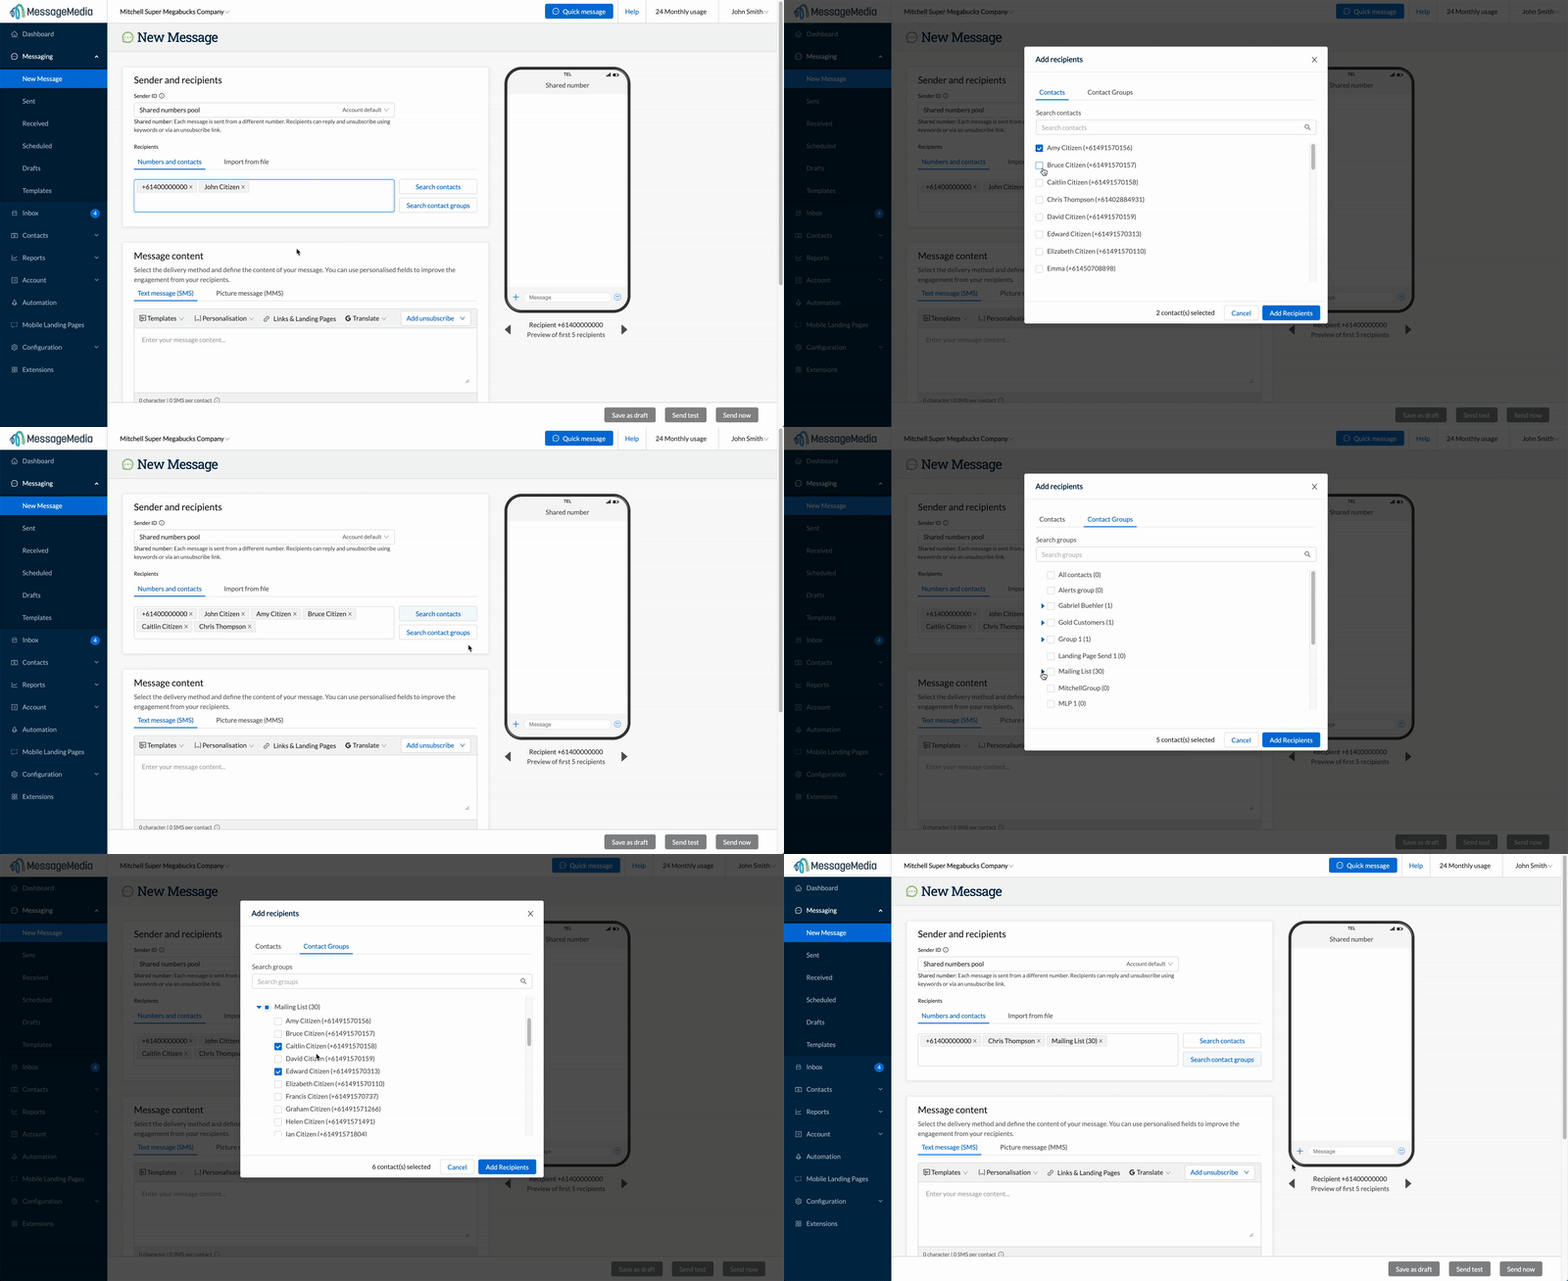
Next, select your sender ID, and then enter the recipient number(s), contact name(s) or group name(s) in the recipient field. You can also search through your contact list and contact groups to add recipients in bulk:
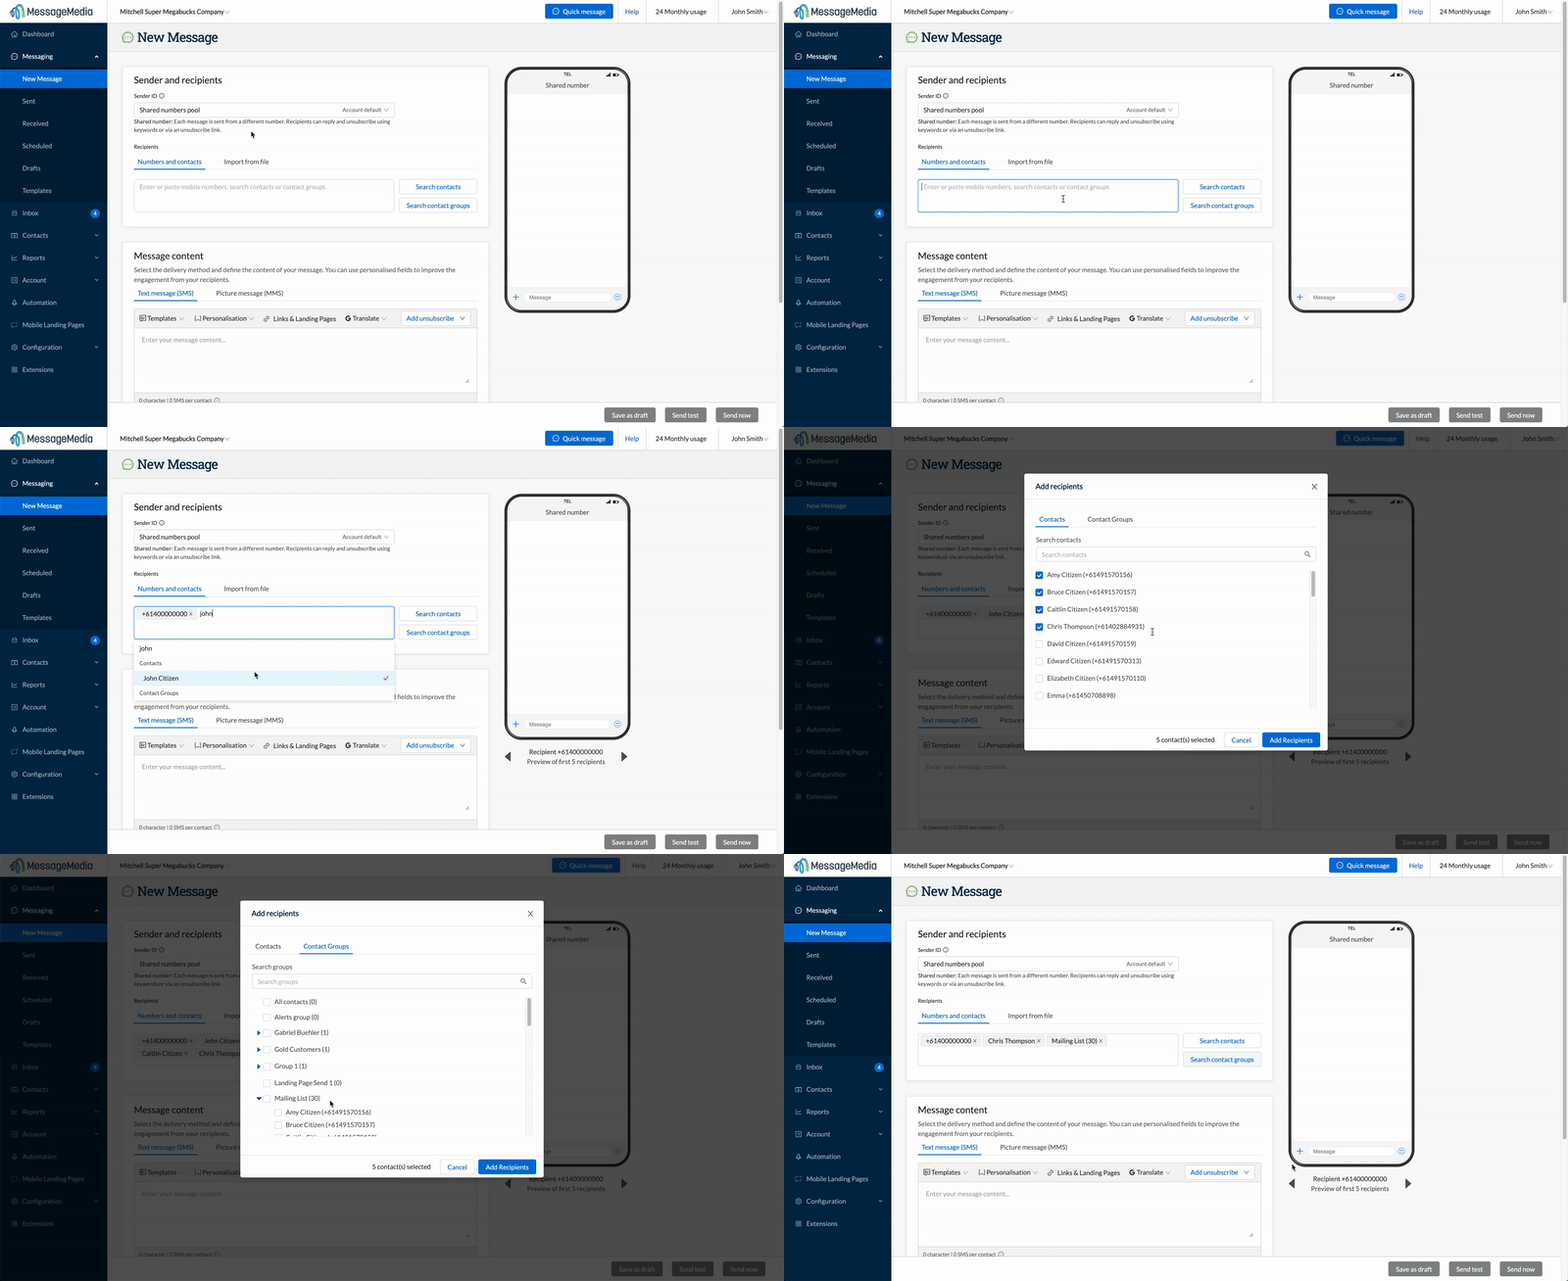
Now, compose your message in the "Message Content" field. You will see that as you type, the message preview on the right will update in real-time. Similar to the Quick Message function, you quickly can add an opt-out message using the "Add Unsubscribe" feature:
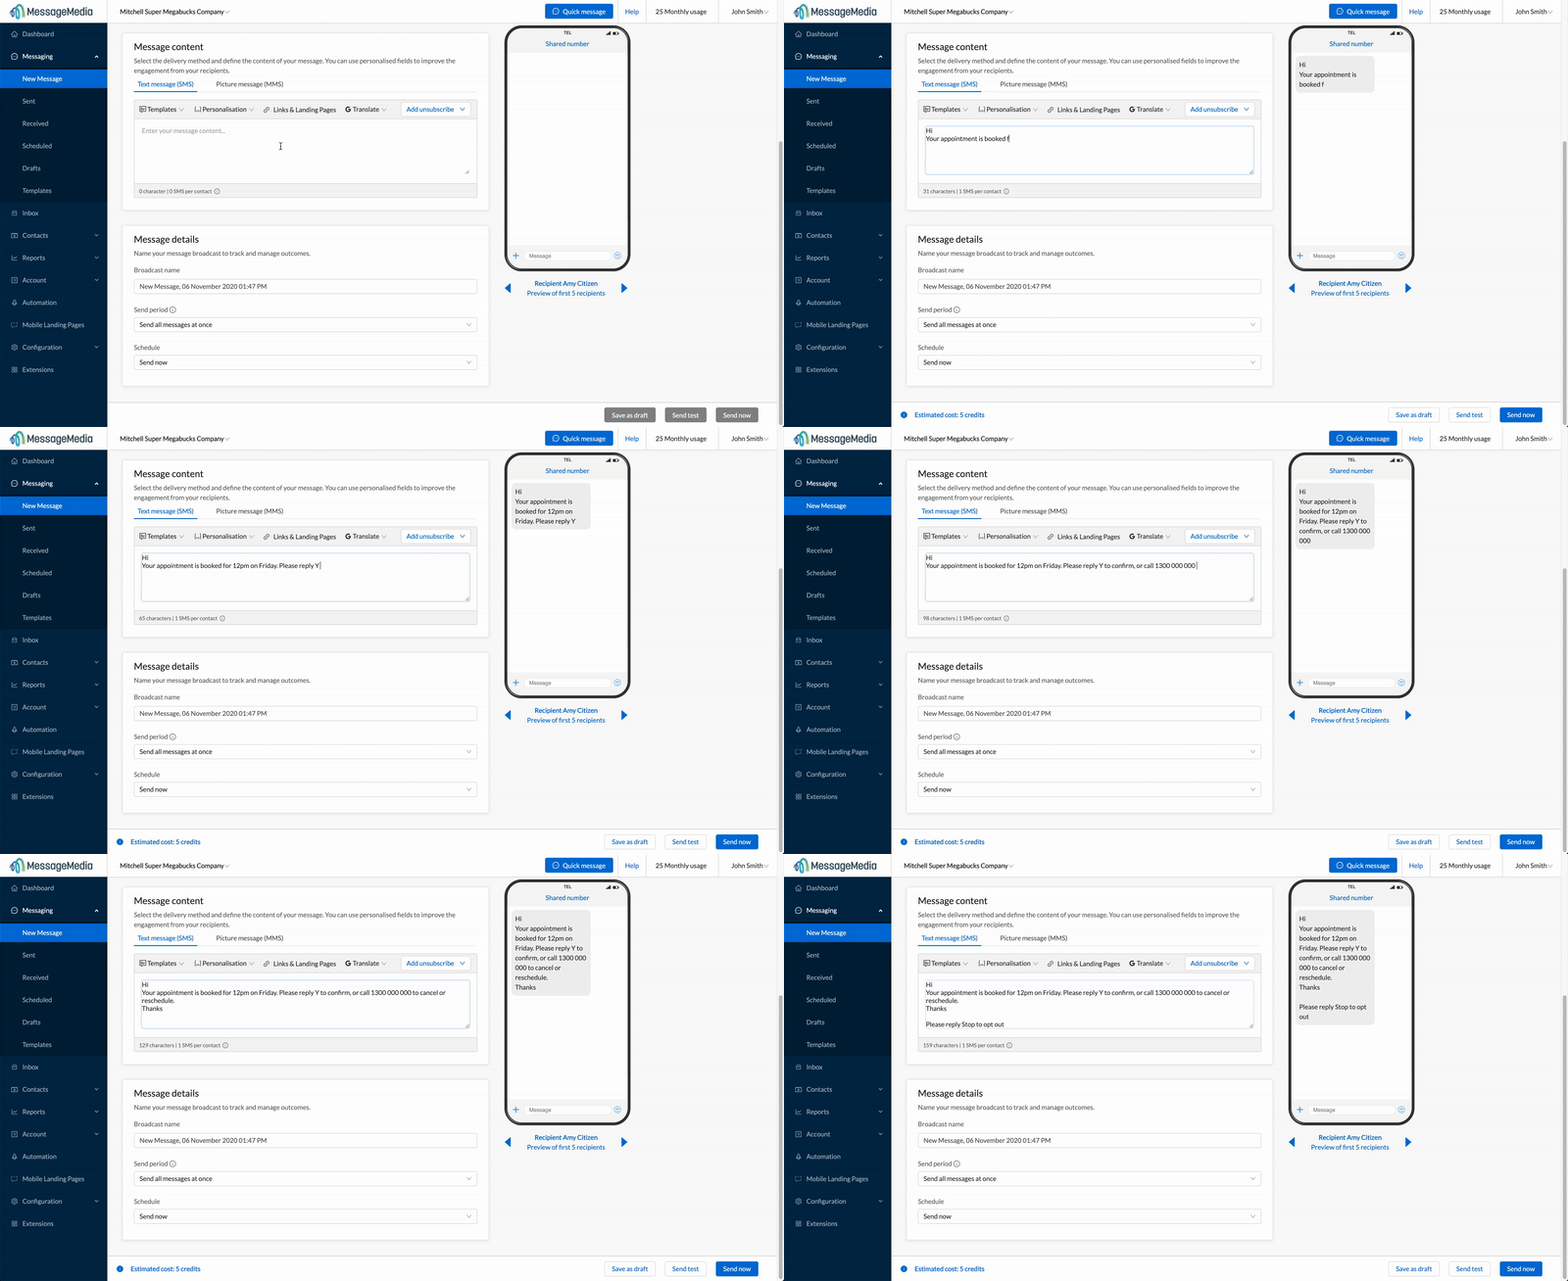
When you are happy with your message, click "Send"
Helpful Tips:
- You can send to multiple contacts and/or groups
- You can add a simple opt-out message by clicking the “Opt out message” button
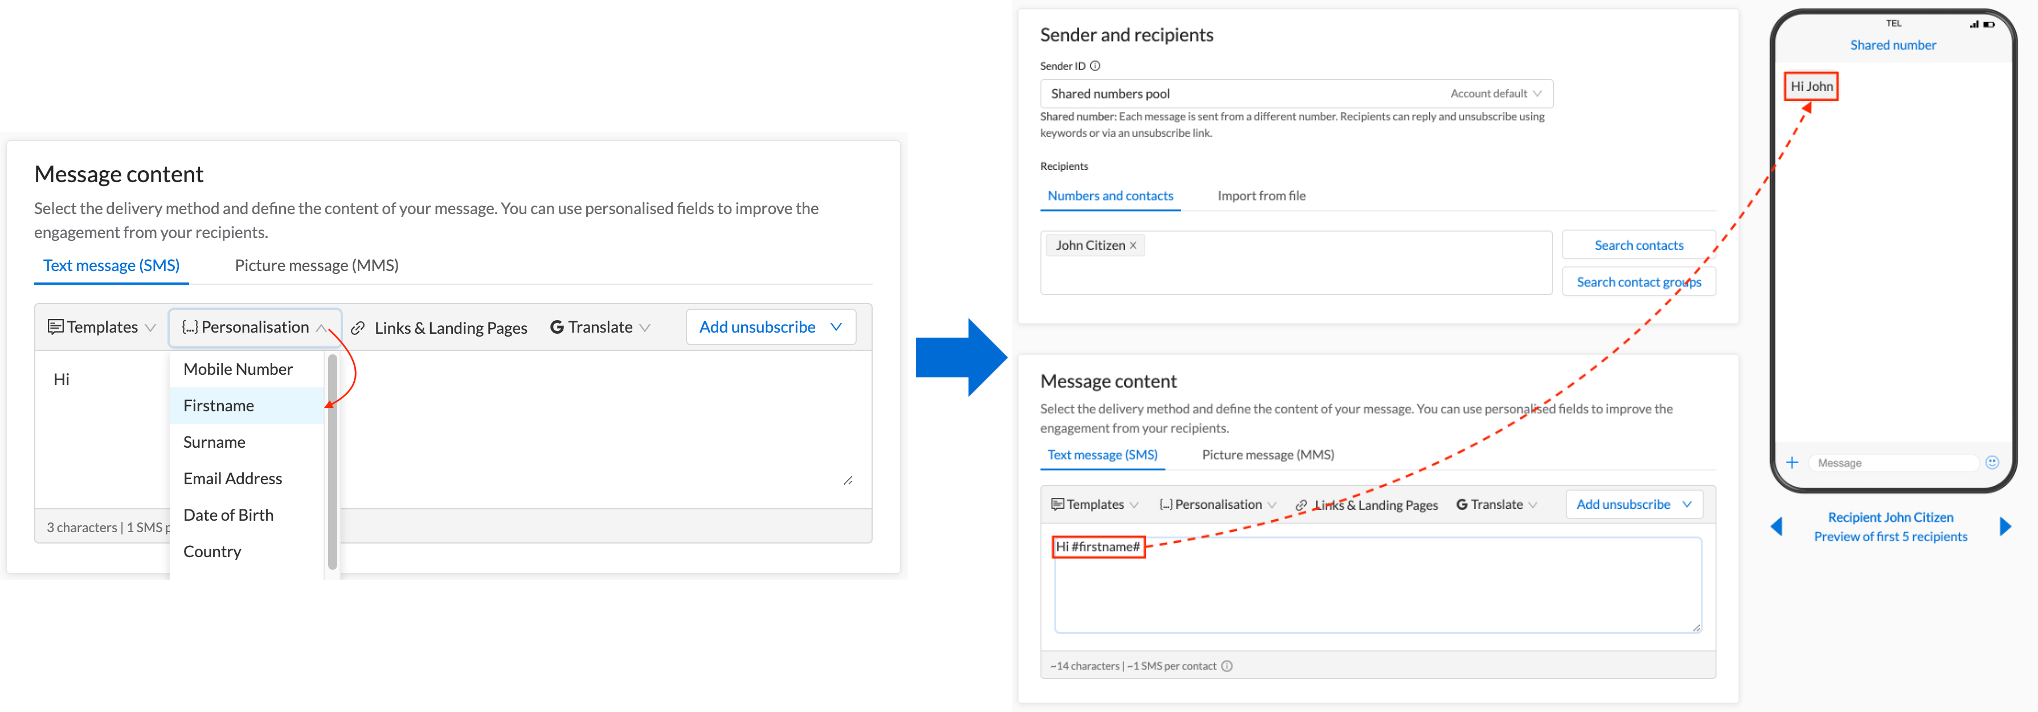
- If you are using personalisation, the preview will show you the content in line with the fields you are using (e.g. if you are sending to a saved contact who's first name is John and you type "Hi #Firstname# ..." the preview will show "Hi John")
Using Personalised fields
When sending to saved contacts, you can personalise your messages by using any of the personalised fields from the contact profile that have been populated with information. When writing your message, simply click on the Personalisation tab to reveal the list of fields and then select the desired field to drop into your message. The preview on the right will update with the data from your first contact in your selected list, and you can scroll through the first five contacts (using the arrows beneath the preview) to ensure the data is populated correctly:
Sending to a List of Numbers
To send the same message content to a large list of numbers, go to Messaging > New Message:
There are a few different ways you can add multiple numbers:
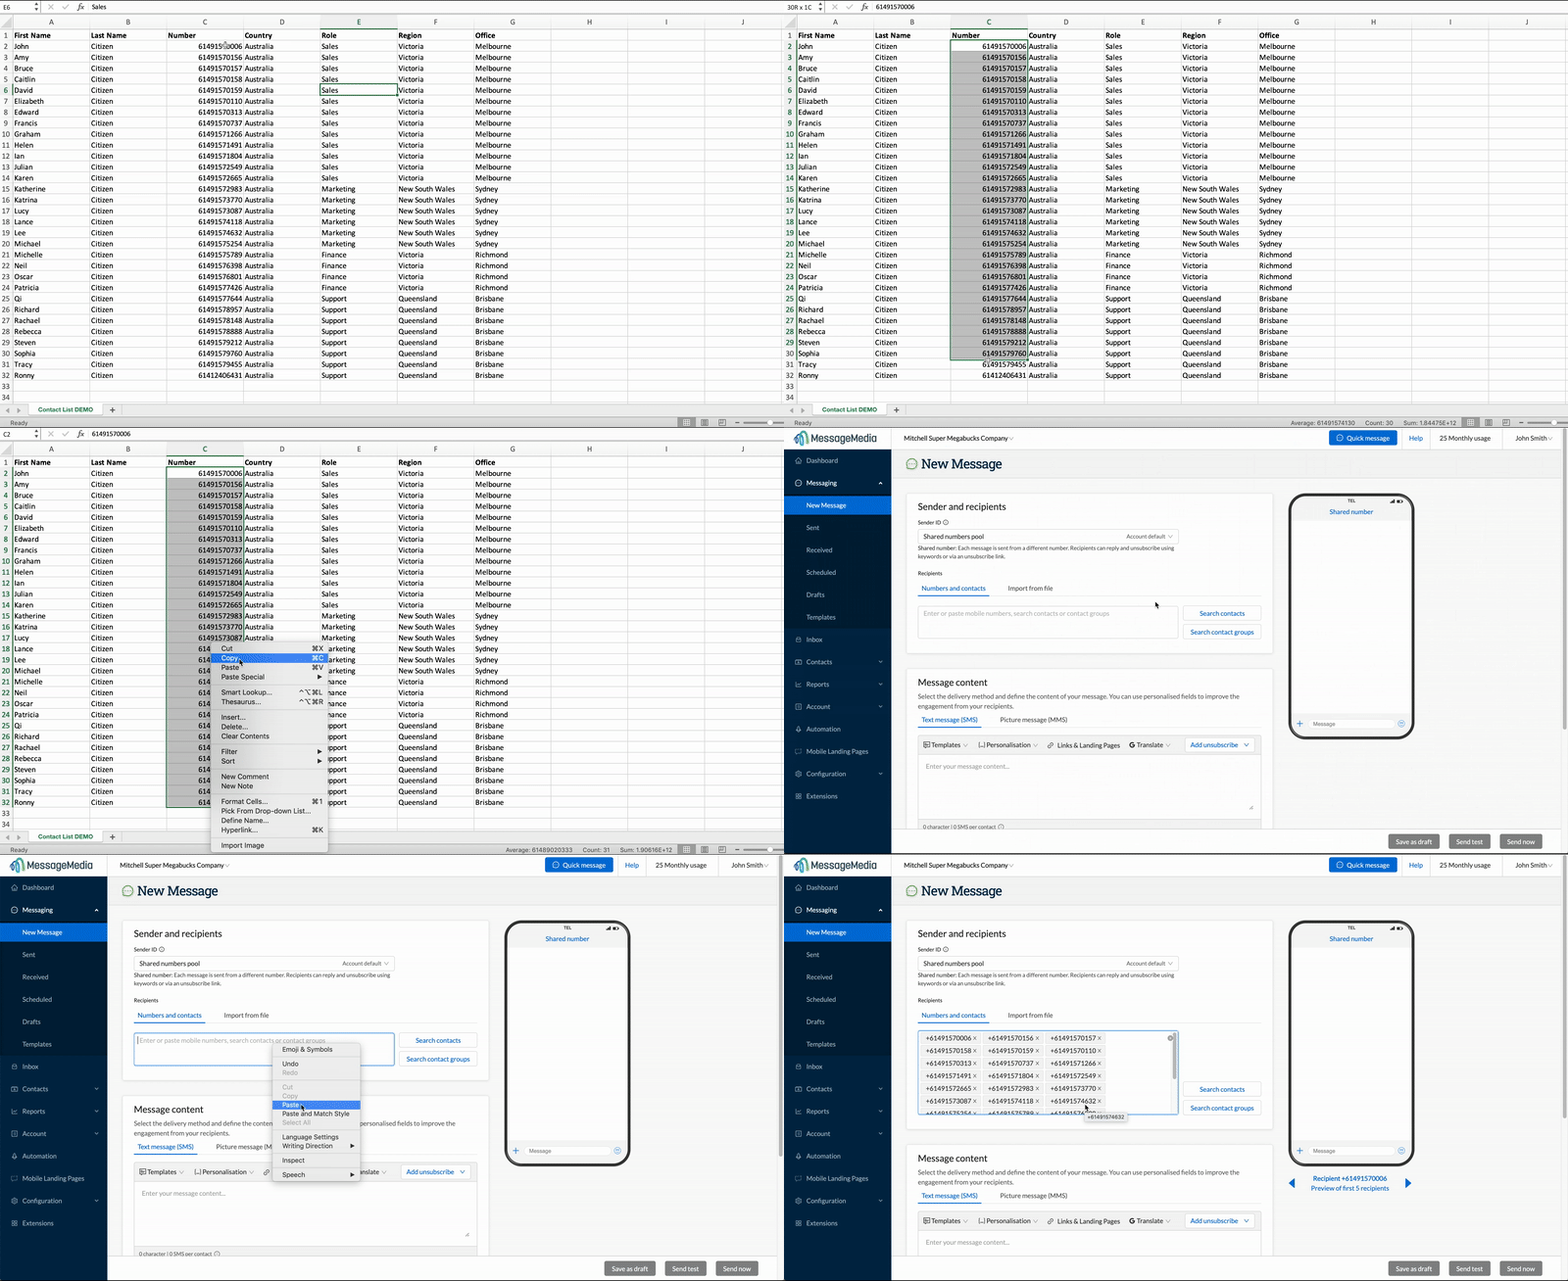
1. Paste Numbers
If you have a list of numbers in a spreadsheet, you can copy them directly from the spreadsheet and paste them into the “To” field:
2. Add Contacts / Groups
- Click on “Browse Contacts” or “Browse Contact Groups” next to the “To” field
- Tick the box next to each contact or group you want to add
- You can search for specific contacts using the search box
3. Import from file
- Click on “Import from file” above the “To” field
- Either drag & Drop your contact list into the upload box, or click “browse” to search for your file (Note – you will need to ensure each contact number has the leading “Zero” at the start – you can do this by formatting the CSV column as “Text”)
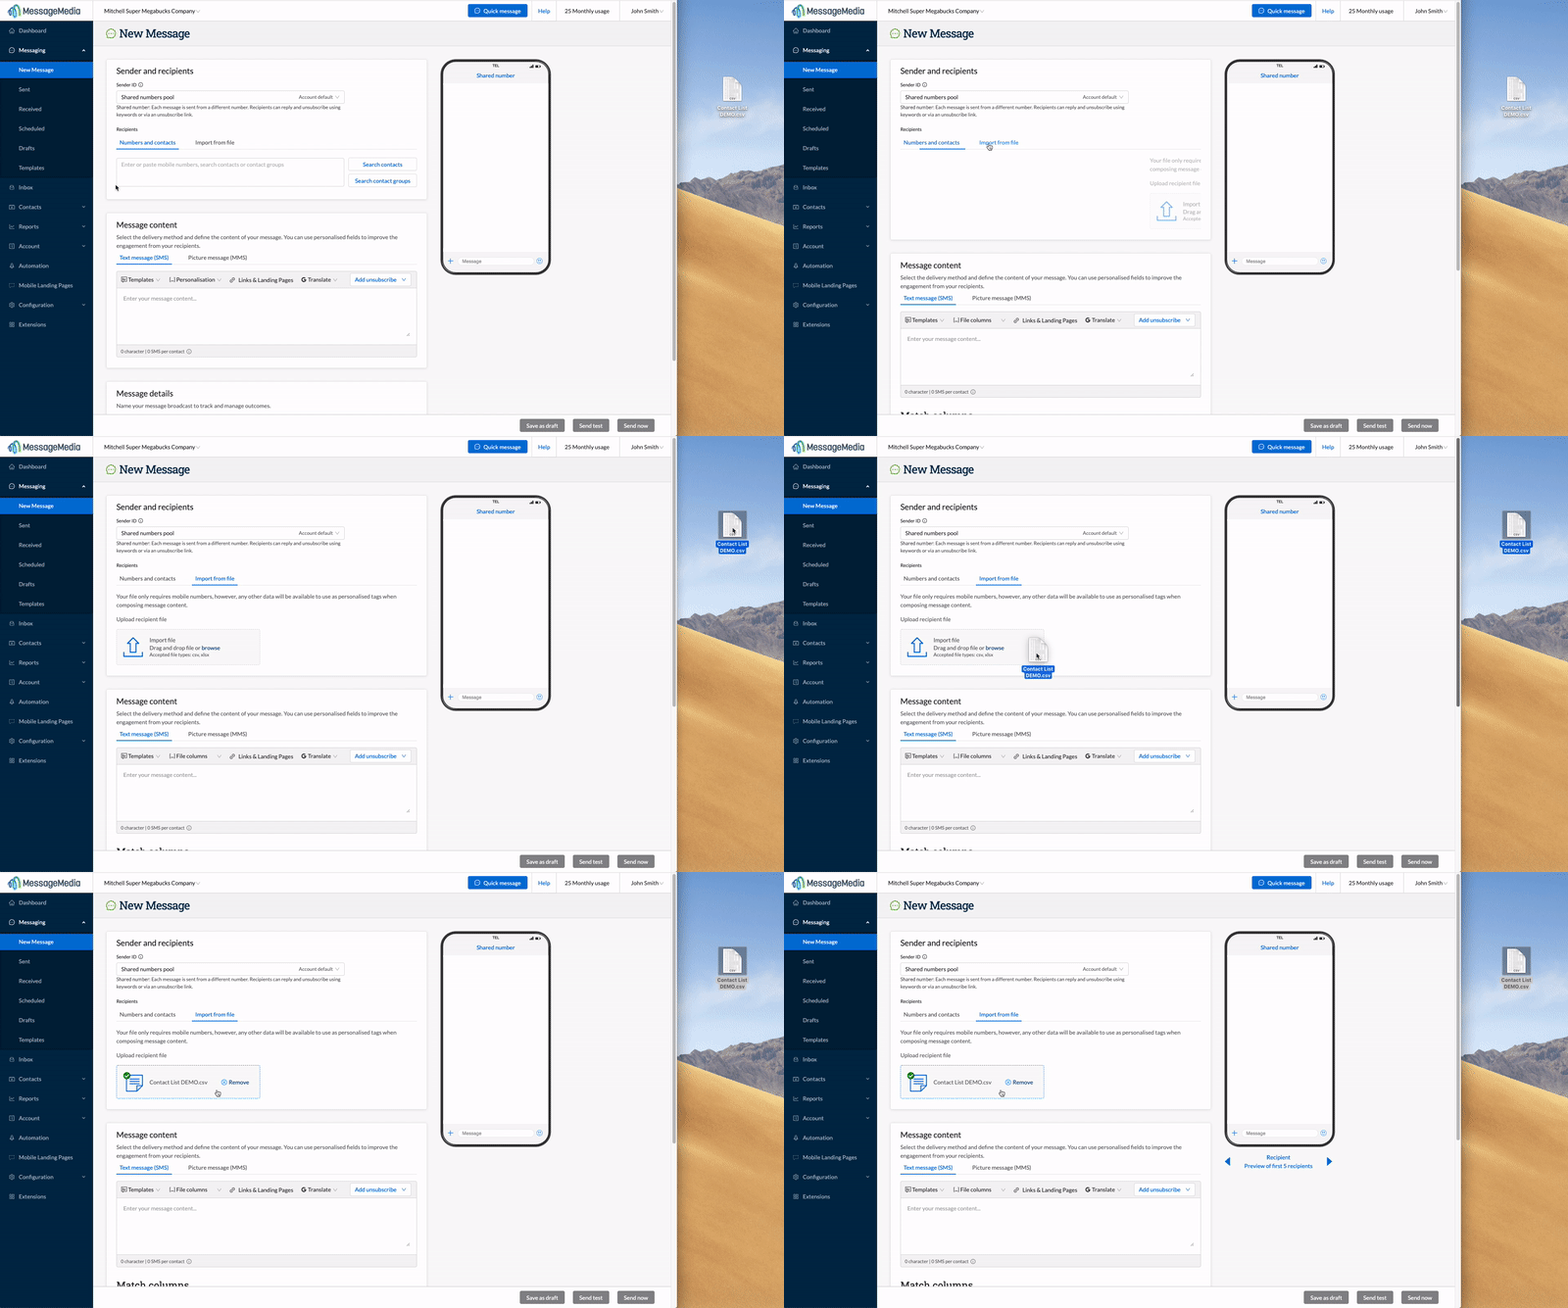
The system will try to automatically detect the mobile number column from your imported data:
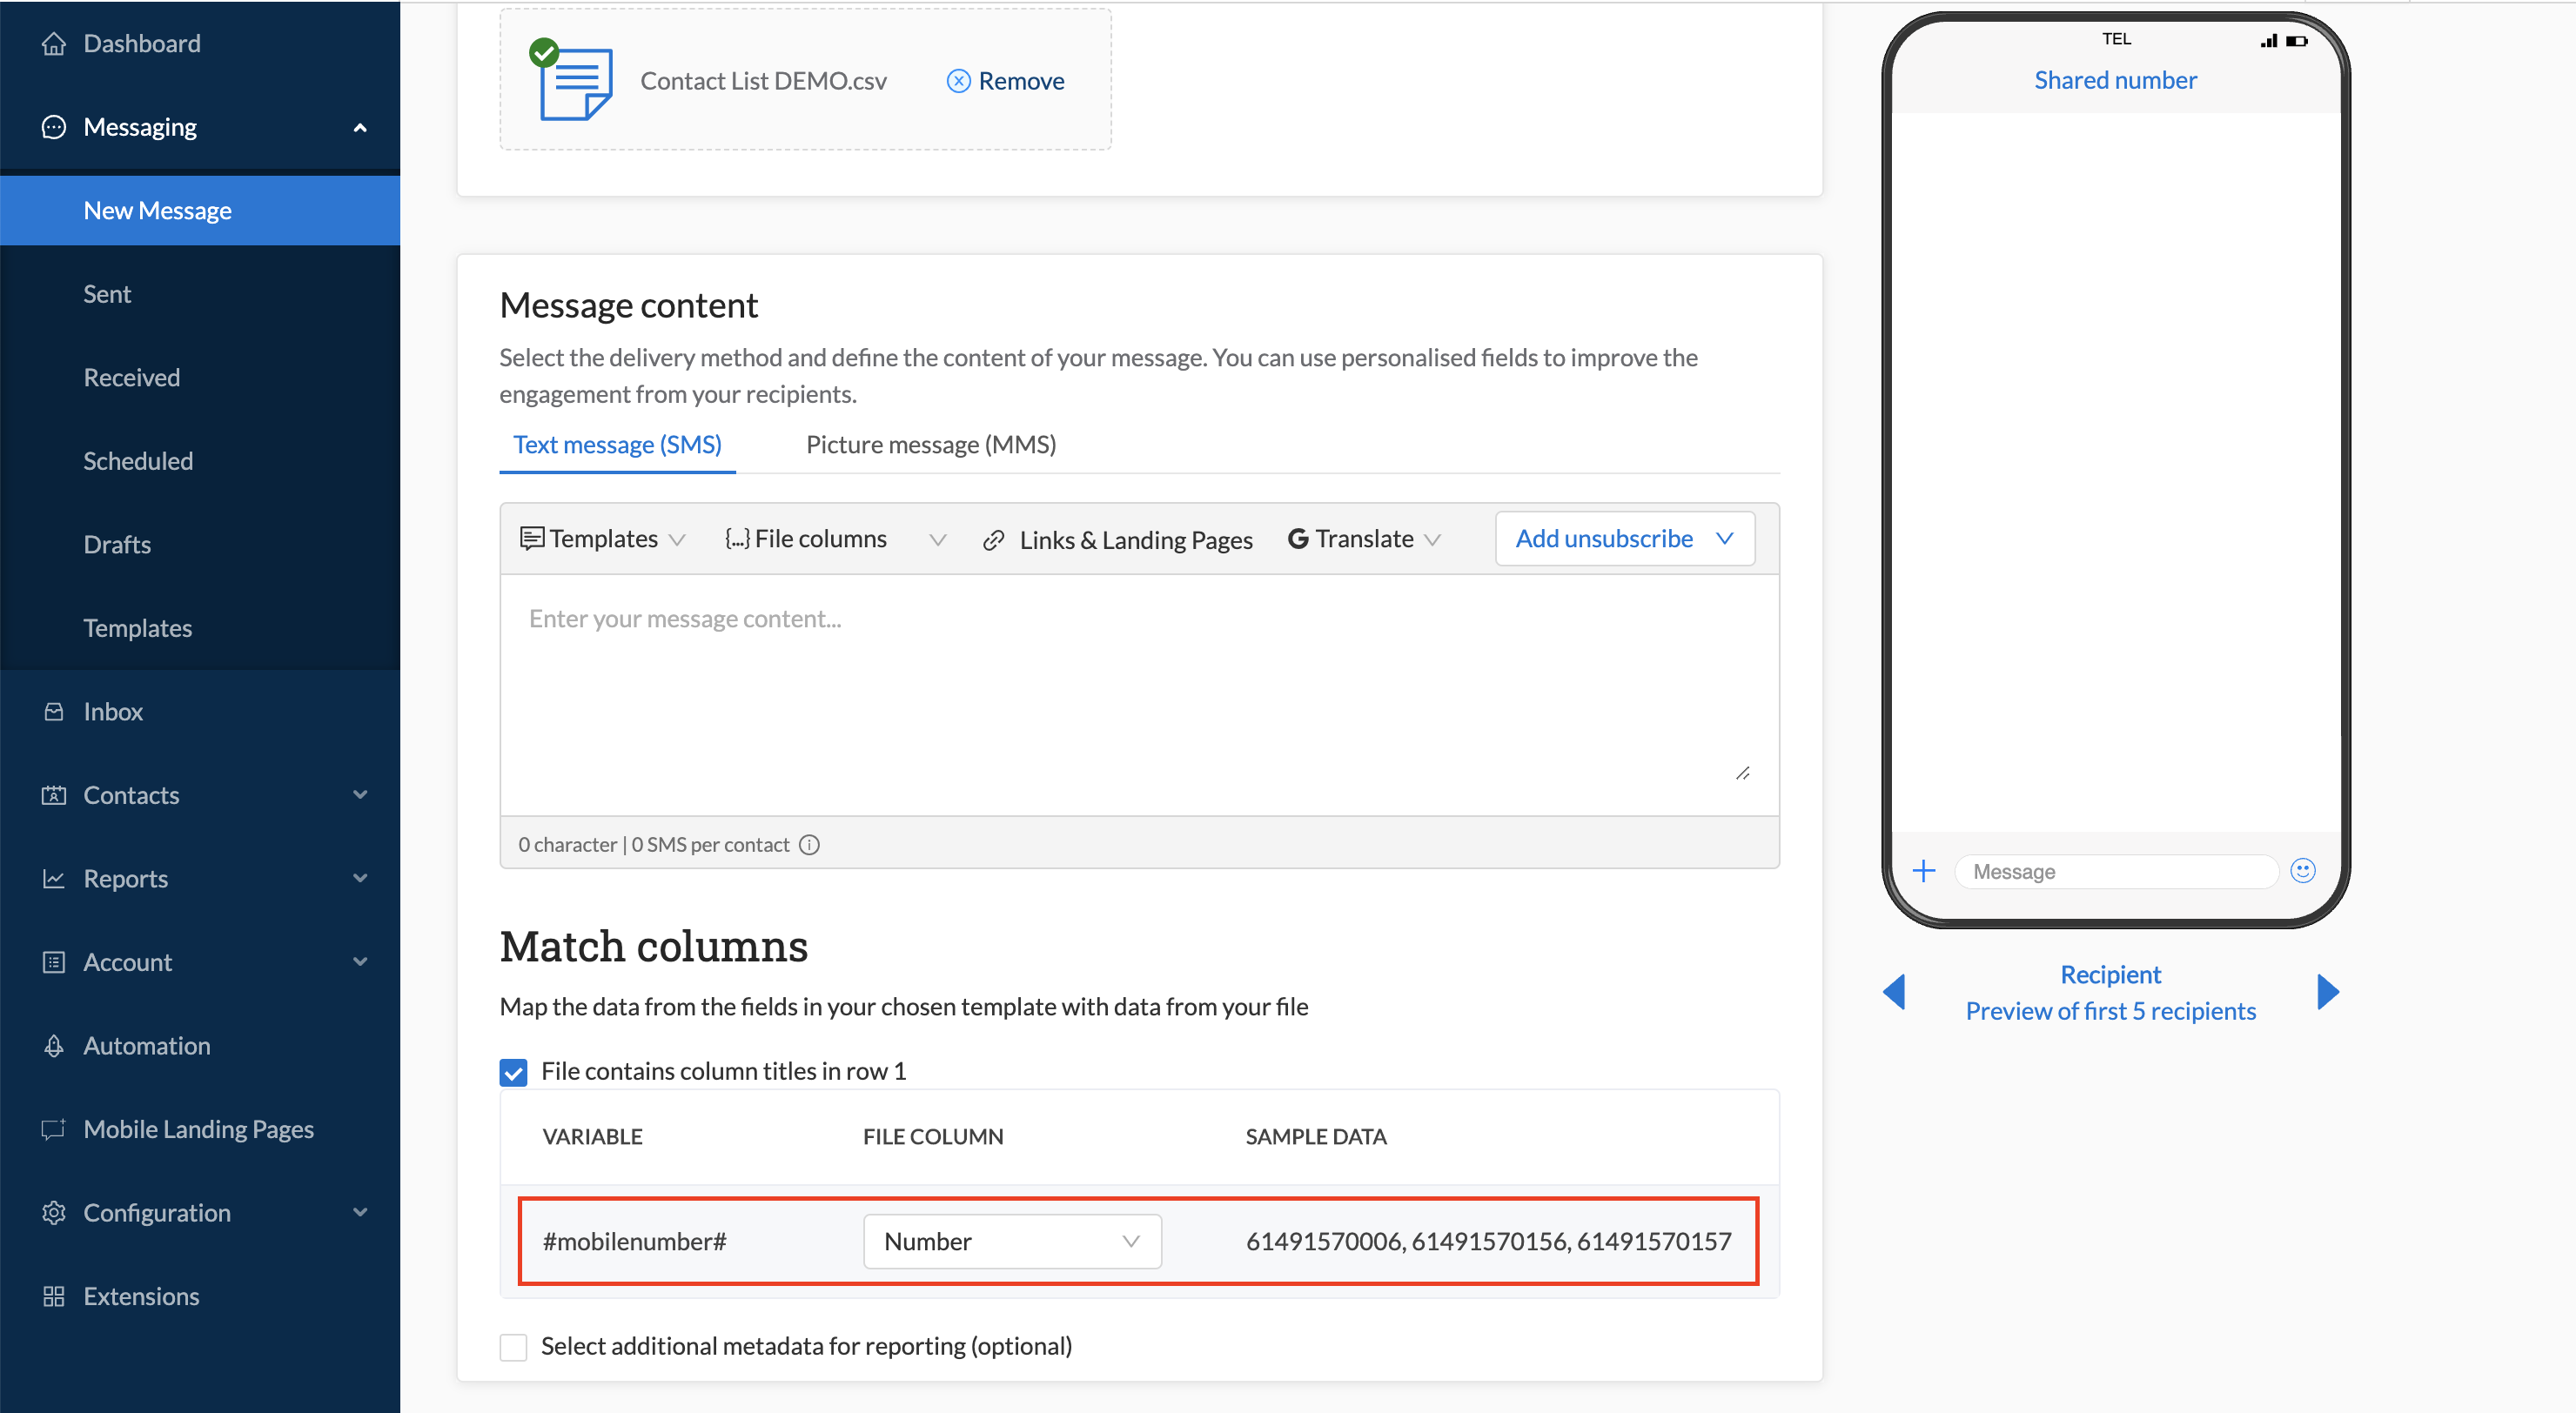
As previously, write your message in the message content field. You will notice that the personalised fields are now mirroring the column headers in your imported data file:
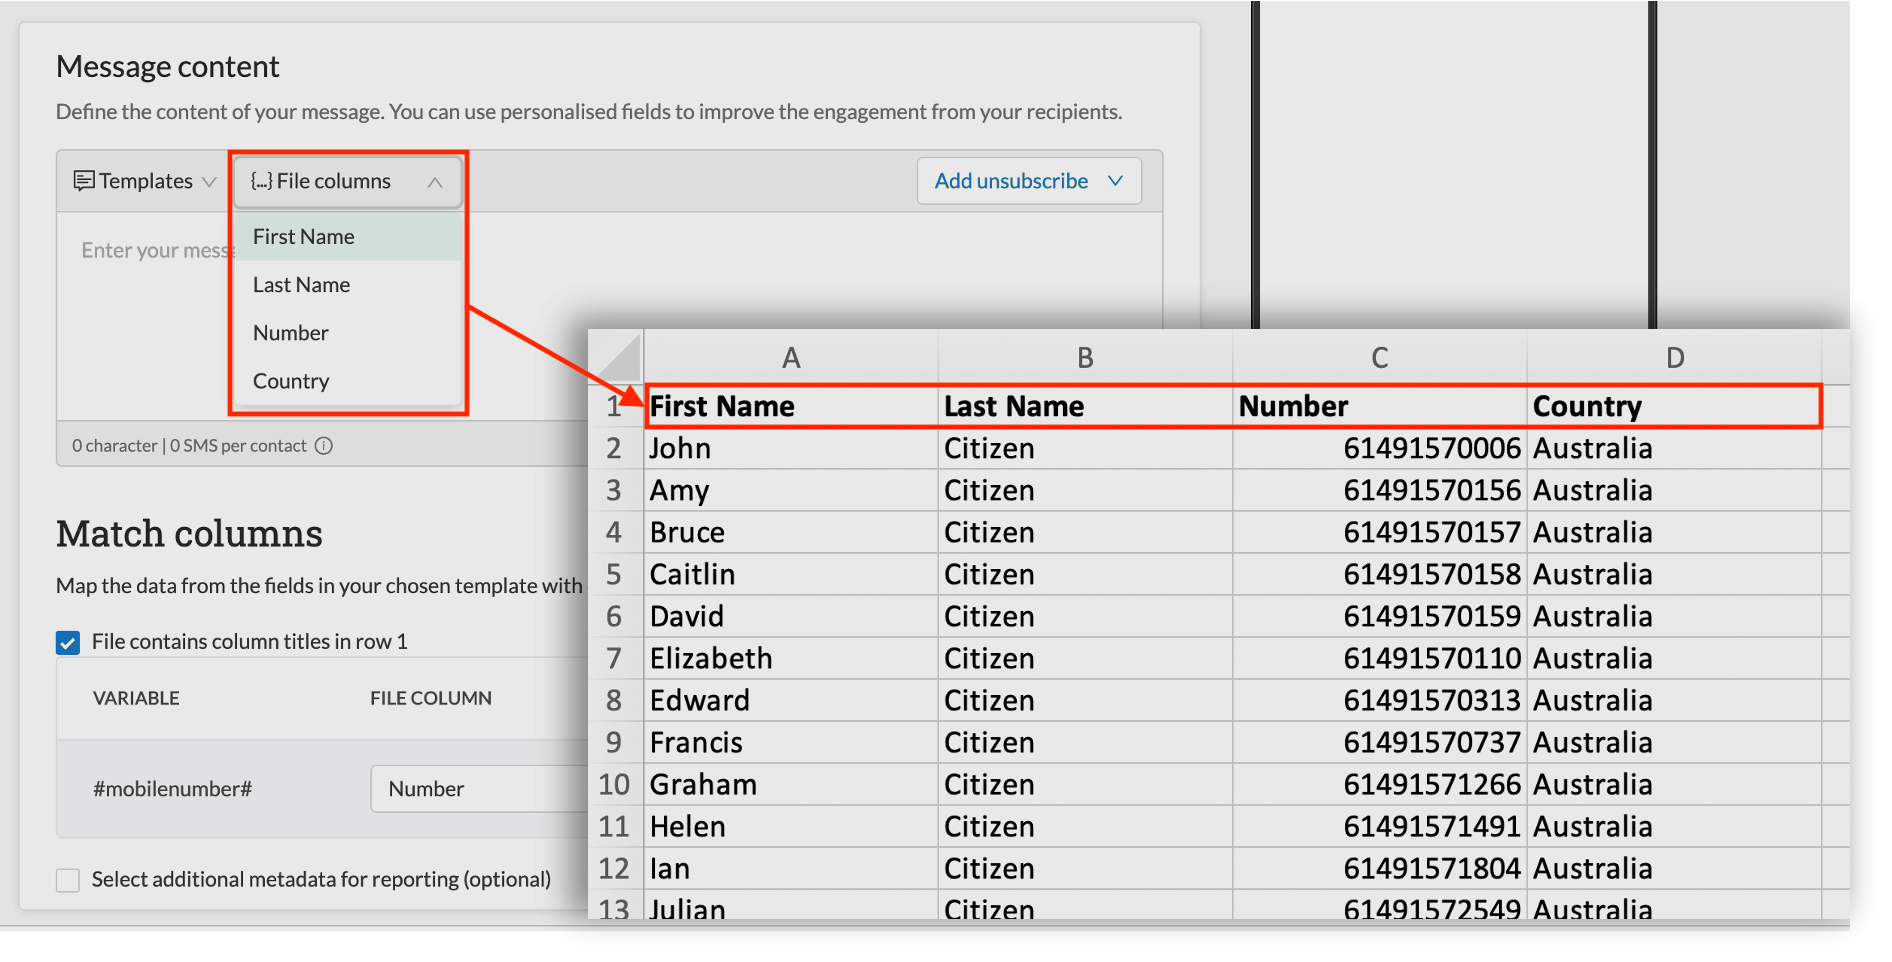
- To see how the message will display on a recipient handset, you can click Send test. This allows you to send the composed message to yourself and/or a colleague without losing any of your data so you can continue with the send after vetting the message.
- Once you are happy, simply click Send now
Draft Messages
It is possible to create a draft of a message that can be saved and reviewed before sending. The "Save as draft" button will appear as an action on the "New Message" screen. To view all draft messages, click on "Drafts" in the Messaging menu:
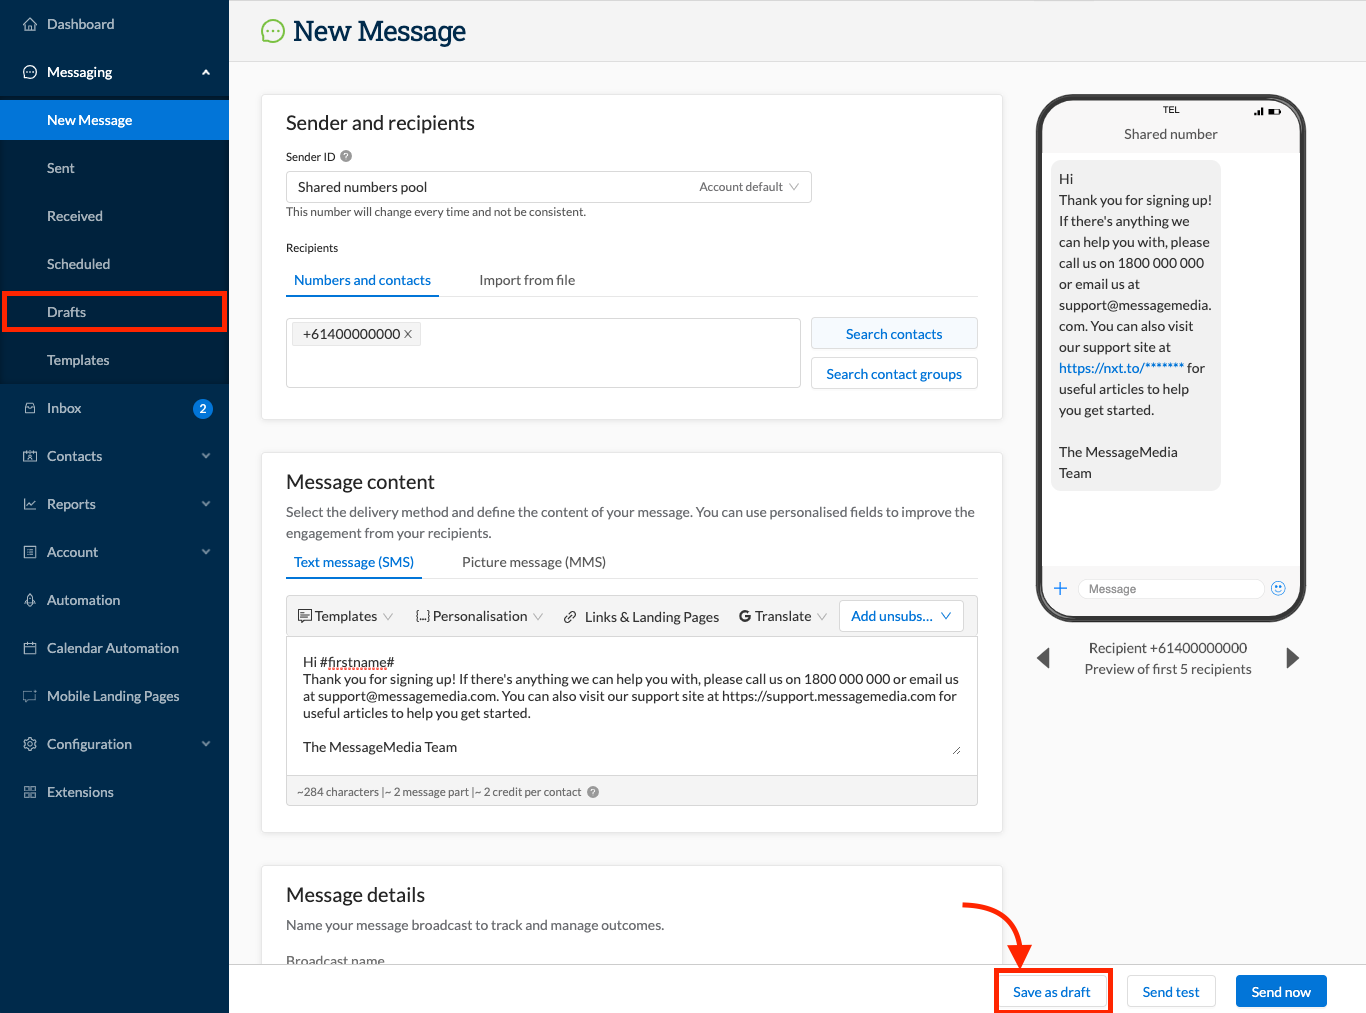
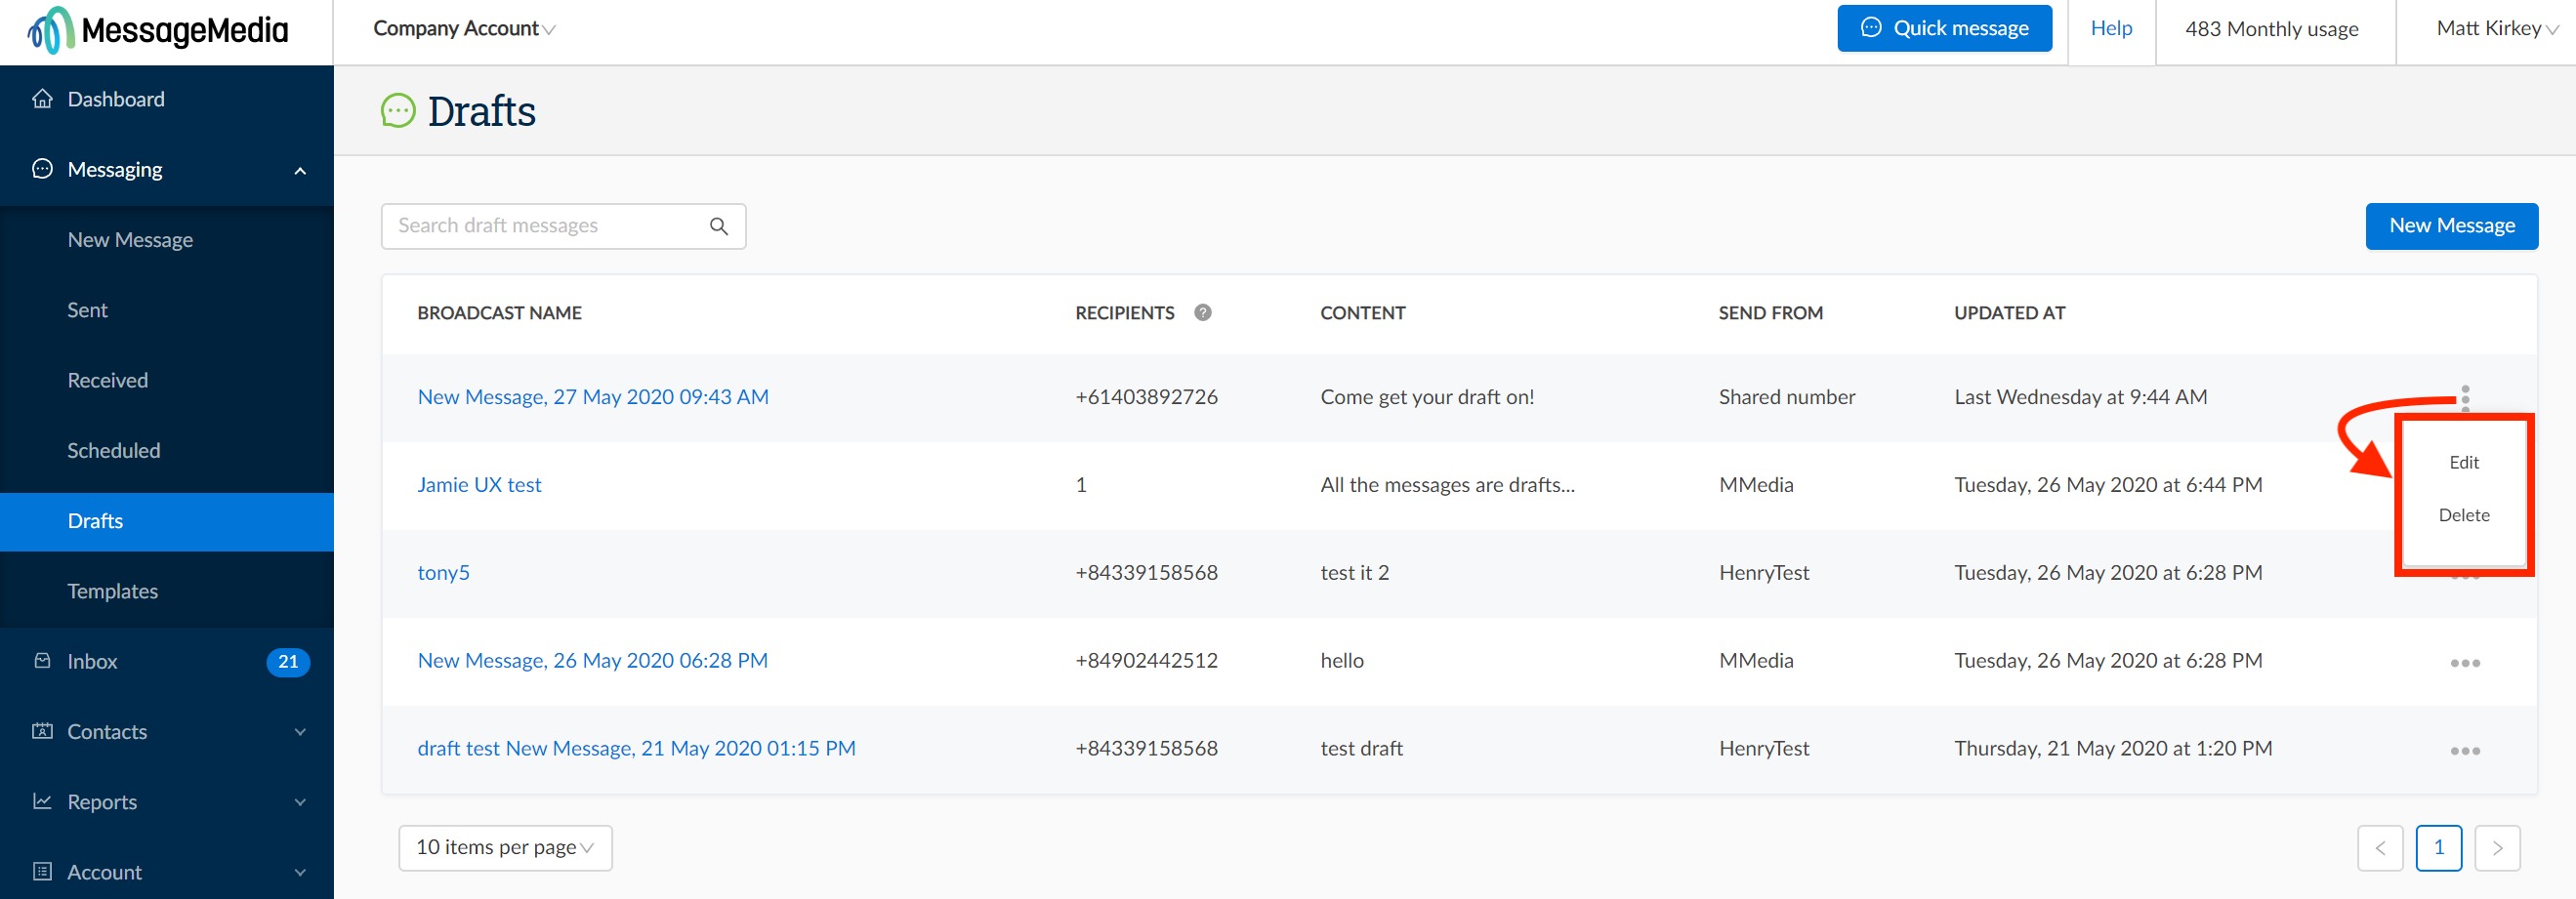
In the Draft Messages list, you will have the ability to edit or delete draft messages by clicking on the three dots to the right of each message:
Forwarding Sent Messages
You can forward sent messages without having to copy the content and paste it into a new message.
This is done by going to Messages, then Sent, then clicking the three dots alongside the message you wish to forward to a new recipient and clicking "Forward":

This will then open a new message screen with the content field pre-populated with the message being forwarded.
Important things to remember
If your messages are not sending correctly, check these important things to see if there are any errors with your broadcast:
- Ensure you have included the correct international code for your numbers. When sending to numbers local to your account location, you do not need to add the international code; however if you enter an international number without the correct prefix, the system will not recognise the number.
- If you are copying and pasting numbers into the recipient field, the web portal will automatically add the international prefix of whatever country you have set as your location, if this prefix is not already present in the number
- E.g. your location is set as Australia, and you are copying numbers from an Excel spreadsheet where the numbers are stored as "4xxxxxxxx" (i.e. the leading zero is missing due to the cell format), then the web portal will automatically paste these numbers into the recipient field as "+614xxxxxxxx"
- If your location is set as the UK, then these numbers would be automatically pasted with "+44" as the international prefix
